What You'll Learn
- How To Create A Key Pair With Certificate
- How To Enable Custom Onboard A Registry in Omnicore
- How To Connect An Omnicore Device With Custom Onboard
- Zero Touch Provisioning requires Registry Ca. (Managing Credentials)
- Create A Root CA And its Certificate
#openssl req -x509 -nodes -sha256 -days validity_certificate -newkey rsa:bits -keyout root_key_file -out root_certificate_file openssl req -x509 -nodes -sha256 -days 1825 -newkey rsa:2048 -keyout rootCA.key -out rootCA.crt - Create A Private Key With OpenSSl
#openssl genrsa -out private_key_filename bits
- Create A Root CA And its Certificate
- Registry-level CA certificates are an optional feature for additional security; you are not required to use them. (Managing Credentials) If you are choosing to go without Registry-level CA certificates, then follow Option A below else follow Option B route.
Option A - Without Registry CA
- Create A Private Key With OpenSSl
#openssl genrsa -out private_key_filename bits openssl genrsa -out private.key 2048 - Create A Public Key With OpenSSl
#openssl rsa -in private_key_filename -outform PEM -pubout -out publickey_filename openssl rsa -in private.key -outform PEM -pubout -out public.pem - The Private Key will be saved as private.key and the public key as public.pem
Option B - With Registry CA
- Create A Root CA And its Certificate
#openssl req -x509 -nodes -sha256 -days validity_certificate -newkey rsa:bits -keyout root_key_file -out root_certificate_file openssl req -x509 -nodes -sha256 -days 1825 -newkey rsa:2048 -keyout rootCA.key -out rootCA.crt - Create A Private Key With OpenSSl
#openssl genrsa -out private_key_filename bits openssl genrsa -out private.key 2048 - Create A Signing Request
#openssl req -key private_key_filename -new -out csr_filename openssl req -key private.key -new -out domain.csr - Sign the Csr With Root CA
#openssl x509 -req -CA root_ca_cert_file -CAkey root_ca_key_file -in csr_filename -out device_cert_filename -days validitiy -CAcreateserial
openssl x509 -req -CA rootCA.crt -CAkey rootCA.key -in domain.csr -out device.crt -days 365 -CAcreateserial
- This Step can be skipped if you already have generated keys and certificates using RSA
- Registry-level CA certificates are an optional feature for additional security; you are not required to use them. (Managing Credentials) If you are choosing to go without Registry-level CA certificates, then follow Option A below else follow Option B route.
Option A - Without Registry CA
- Create A Private Key With OpenSSl
#openssl ecparam -genkey -name prime256v1 -noout -out file_name openssl ecparam -genkey -name prime256v1 -noout -out ec_private.key - Create A Public Key With OpenSSl
#openssl ec -in private_key_filename -outform PEM -pubout -out publickey_filename openssl ec -in ec_private.key -pubout -outform PEM -pubout -out ec_public.pem - The Private Key will be saved as ec_private.key and the public key as ec_public.pem
Option B - With Registry CA
- Create A Root CA And its Certificate
#openssl req -x509 -nodes -sha256 -days validity_certificate -newkey rsa:bits -keyout root_key_file -out root_certificate_file openssl req -x509 -nodes -sha256 -days 1825 -newkey rsa:2048 -keyout rootCA.key -out rootCA.crt - Create A Private Key With OpenSSl
#openssl ecparam -genkey -name prime256v1 -noout -out file_name openssl ecparam -genkey -name prime256v1 -noout -out ec_private.key - Create A Signing Request
#openssl req -key private_key_filename -new -out csr_filename openssl req -key ec_private.key -new -out domain.csr - Sign the Csr With Root CA
#openssl x509 -req -CA root_ca_cert_file -CAkey root_ca_key_file -in csr_filename -out device_cert_filename -days validitiy -CAcreateserial
openssl x509 -req -CA rootCA.crt -CAkey rootCA.key -in domain.csr -out device.crt -days 365 -CAcreateserial
- Go To Registry Tab and click on New Registry
- If Root CA is needed, Paste the rootCA.crt generated in the previous step and paste it in the authentication.
- Enter Registry Details and Click Create. Sample Data is shown below.
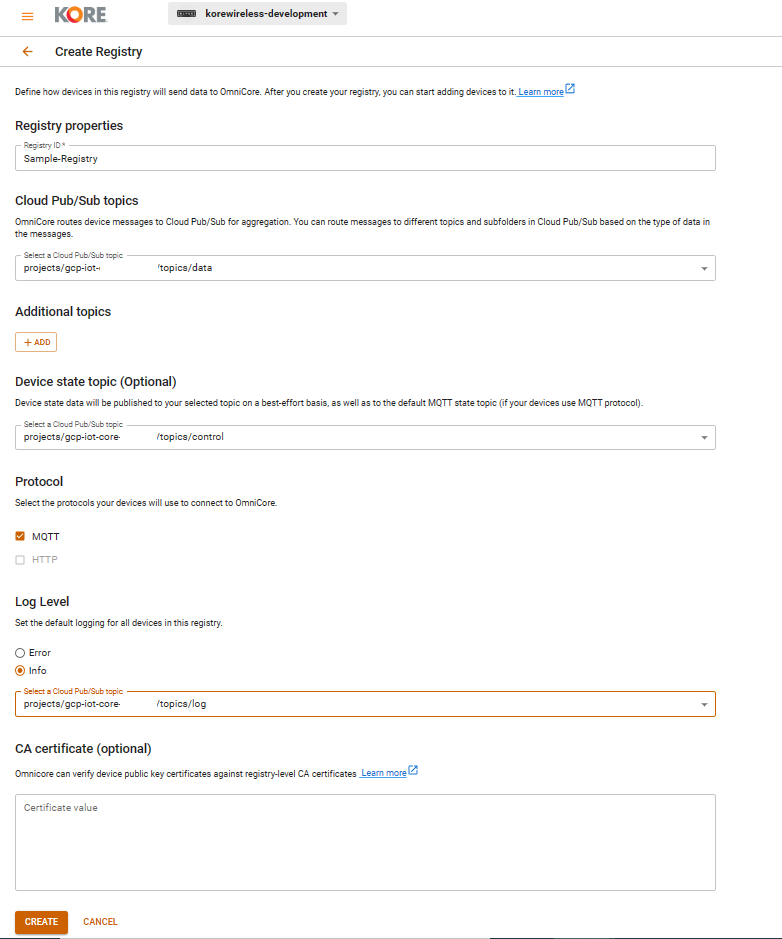
- Enable Custom Onboard in Zero Touch Provisioning Field.
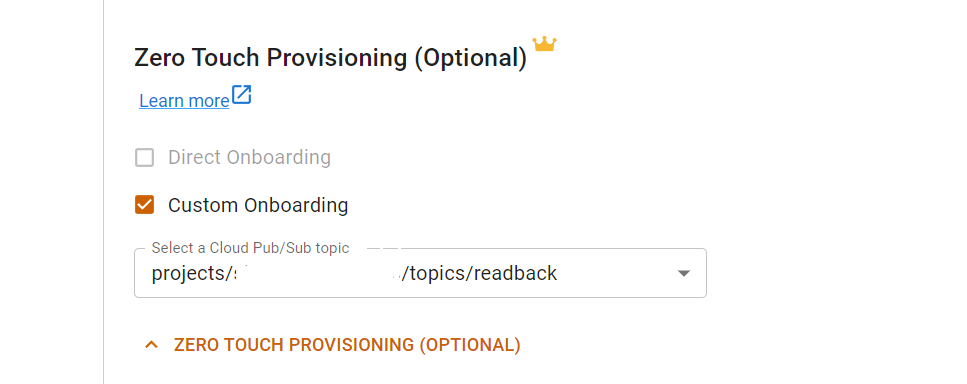
- Choose the Pubsub Topic to forward devices details onboarding via custom onboarding for further process.
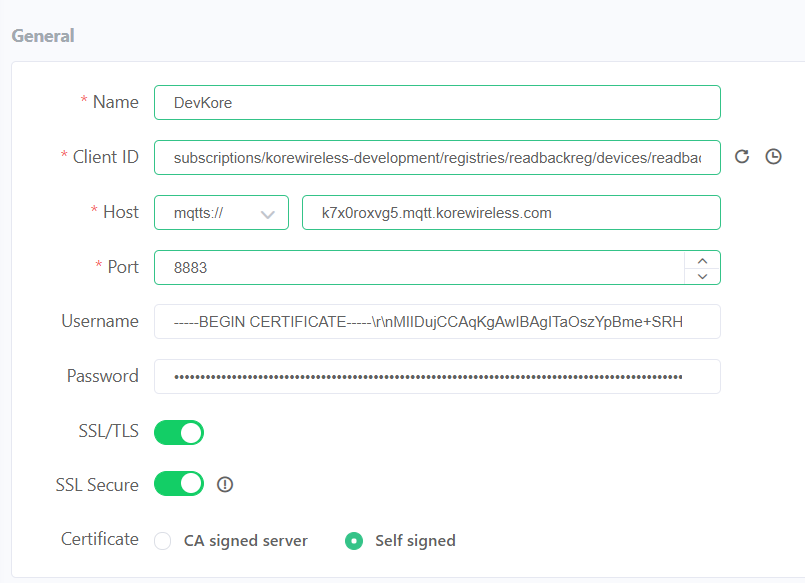
- In addition to the regular mqtt fields , custom onboard requires a certificate in the username field which is validated against the registry Ca.
- Once Device is connected, a message is forward to the custom onboard pubsub topic.
- Device can send messages to the custom onboard forwarding pubsub topic by publishing device messages to /Registry_Id/Device_Id/onboardStatus.
- Fetch the details of the custom onboarded device from custom onboard forwarding pubsub topic.

- We can process these details and approve or refuse to custom onboard this device by calling the updateCustomOnboard Method in the Omnicore Sdk or Rest Api. (Update Custom Onboard)
- The device should subscribe to mqtt topic /Registry_Id/Device_Id/onboard with Qos 1.If approved , the api requires the details of the device to be onboarded similar to a createDevice call and a message which needs to be sent to be device, once its done the custom onboarded device should receive a message on the mqtt onboard topic with the details sent via api and disconnected from broker.The Client is expected to reconnect once approval is done normally,without any certificate in username field.
- If the authorizer needs to refuse this onboard request ,it can call the api with approval as false with custom data if necessary and this is sent to device and then disconnected directly from the broker.